
12 May

Through the article we will discuss advertising on Google AdWords
- Types of advertising on Google
- Creating a Google ad campaign in Google Ads – step by step
- Google ADS functions
- Keywords
- Google Keyword Research
- Setting up Google Ad Sets
- How to create Google Ads
- Responsive search ad
- Ad Extensions
- Setting up Google conversions and connecting Google Ads to Google Analytics.
Google is a search engine that people use when searching for solutions (products, services, tips) for their current problem. Therefore, when used properly, it can be a source of high quality traffic to your website, as it is used by people who are already aware of their problem and are actively looking for solutions.
Google also owns the second largest search engine in the world, which only searches among videos: Youtube.
As a result, advertising on Google and Youtube is carried out by one tool: Google Ads.
This article is (also) intended for complete beginners who need instructions for creating their first ad campaigns on Google or Youtube.
You can also use the article as a practical guide to create your first Google advertising campaign as you read this article.
To make the key steps in creating different types of Google Ads clearer and more understandable, I also used print screens.
Types of advertising on Google
- Search Network ads
Ads on the Google search network are the most typical ads on Google. They appear when people type keywords into Google that you, as advertisers, pre-specify.
Let’s say you specify that your ad appears when someone in your country in a specific language types into Google “digital marketing”.
Once these conditions are met, your ad will appear.
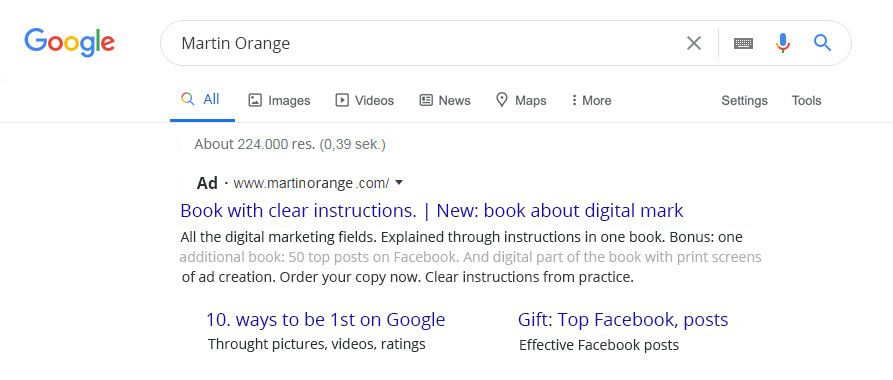
- Display Network ads
They are Google ads that appear on websites that collaborate with Google.
Because this type of ad is made up of images and text, they are very similar to regular web banners. They can be recognized by a blue X and a blue arrow.
Clicking on one of these two characters will let you know that this is an ad created on Google. Youtube video can also be used instead of pictures.
Google Display advertising is usually used for remarketing to people who have already visited your site.

- Youtube ads
The basis for successful advertising on Youtube is, of course, an interesting video that attracts people to watch the video to the end in the first few seconds. After that, the viewer can click on the Skip ad button. Therefore, the purpose of the start of a video should be to attract attention and raise expectations to the point that viewers will watch as much of the video as possible and then click on the button that takes them to your website.
So create an ad campaign on Google Ads. But before that, you need to create a Youtube channel and link it to Google Ads. Then, of course, you have to record, edit and upload the video to your Youtube channel. Don’t forget to add subtitles as most videos (approx. 80%) are played without sound.

– 100 € discount
–100 € discount on all e-courses


Create a Google advertising campaign in Google Ads - step by step
If you don’t have a Google Ads account yet, you need to create one on ads.google.com.
Sign up with your personal Gmail address and open a Google Ads account.
When opening a Google Ads account, do not fall into the offered trap or click on any of the offered options shown in gray boxes. Choose the advanced option at the bottom of the page: Switch to Expert Mode.

Welcome to the Google Ads environment. First, make sure you see a vertical black column on the far left. If not, find the arrow on the left side of the screen and click on it to display the black control column.

To avoid entering bank card details, select the option: Create an account without a campaign. The next step takes you to confirm your information. Be sure to choose the correct time zone and currency. Congratulations! You have created your first Google ADS account. 🙂

- Step 1: How to make your first Google Ads campaign
In this article, we will discuss the creation of a basic Google ad in the Search network.
In the black control banner or in the far left column, select ”Search network”.
Then click on “Campaigns” in the adjacent gray column.
In the middle of the page, find and click the round blue button or find the button “New Campaign”.

- Step 2: Select your Google ad campaign goal
The following window will appear asking you to set a goal for your Google campaign.
If you go over a particular window with your mouse, it will show you which advertising options each option gives you.
With the goal of “Brand Awarenes”, you will be able to advertise only with “Display ads” and “Video ads”. If you choose, for example, the ”Sales” goal you’ll be able to advertise with all types of campaigns (this information appears at the bottom of each window when you go over it with your mouse).
“IMPORTANT: I always choose the option »Create a campaing without a goal’s guidence«. This type of campaign enables the implementation of all types of advertising campaigns. ”
When you decide on a specific advertising goal (for example, I chose the Sales goal for the means of this article), a new window will appear below where you will select the type of advertising.

- Step 3: Select the Google Ads campaign type
Because we are creating an advertising campaign in the Search Network, I will select the goal “Search”.
Once you’ve selected your campaign type, you’ll be able to choose where your ad should lead. You can choose from:
”Website visits”,
“Phone calls”,
”Store visits”,
“App downloads”.
For the purpose of this article, I will choose probably the most common goal “Website visits”. Then paste the URL link of your landing page into the box and continue creating your campaign.
- Step 4: Choose a campaign name
A window will appear as shown in the printscreen below. Specify a campaign name first. It makes the most sense to create one campaign to generate traffic and one remarketing campaign for previous website visits or views of Youtube videos. I suggest that you always start the campaign name with the product name to make it easier to differentiate between campaigns.
- Step 5: Networks
In the Networks section, Google offers you text ad advertising on both the Search Network and the Display Network. Since we’re creating a campaign on the Search Network, uncheck the other option, Display Network.
So you continue to create your campaign only on the Search Network. This is followed by setting the advertising location.

- Step 6: Set up a location in Google Ads
You can choose the locations of the areas where people who type the right keywords on Google will see your ad. You can select your entire country, any other country in the world, or just a single city or multiple cities at once. For this option, click on the “Advanced search”.
A new window with a map will appear.
Here you select the names of the places you want to target. Ads can appear in the territory of the cities themselves, or you can choose a radius around the cities, e.g. Ljubljana and 20 km around.
You can also, if desired, exclude certain locations. When you have set everything, don’t forget to click Save.

- Step 7: Languages
Then choose the languages in which you want your audience to use Google. If this is not important to you, leave the setting blank or All languages.
- Step 8: Audiences
When advertising on Google we can, similarly as on Facebook, specify the audience to which our ads should be shown.
We’ll use this section primarily for “Display and Video Ads,” as “Search” ads primarily target people by the keywordsthey type into Google.
Use this setting for search ads primarily to measure results from individual groups. In the lower part of the window, you will be able to choose between “Targeting” and “Observation”.
In the beginning, select “Observation” and select the groups of people you would like to observe in more detail.
Through advertising, you will get information about which target groups respond better to your ads.
However, to make it easier to create a campaign at the beginning, you can simply skip this step and continue setting your budget.
- Step 9: Budget and bidding
Determine how much you are willing to invest in advertising per day. I recommend you start with smaller amounts. At 5 € a day, you will spend 150 € in one month. If you have multiple campaigns, and you also advertise on Facebook, the amount can quickly be 1,000 € or more. Depending on the results, you can change your budget at any time.
You must also choose the ”Bid strategy”. So what do you want to optimize your ad campaign for.
If you have not set up conversions, the only option left is ”Maximize clicks”. Better yet, first set up custom conversions (see instructions towards the end of the article) and then select the ”Maximize Conversions” option.
There are a number of options available:

- Step 10: Ad extensions
Don’t skip the ad extension. Take your time and make at least these three types of extensions:
- Page extensions (Sitelinks),
- Callout Extensions,
- Phone extensions
Ad Extensions are very important because they:
- create greater visibility of the ad (especially on a mobile phone)
- can take a visitor to several different subpages,
- communicate various benefits to visitors,
- call for action,
- increase the number of phone calls,
- improve Ad Quality Score.
Example of a Sitelink extension »London restaurants« and a random ad display below:

Read more about Sitelink Extensions towards the end of the article.
So create page extensions and then click “Save and continue”.
You have now returned to the basic Google Ads environment and can see the “Select campaign settings” checkbox, which you have now successfully set up.
Before continuing with the creation of Ad Sets and the ads themselves, we will learn about the functionality of the Google Ads platform and how we use them.
Google ADS functions
Google AdWords is a very broad platform that manages your entire advertising on Google. Here you can also access all support tools such as Google Keyword Planner and Google Analytics.
No matter where you are, you will always return to the main view of the platform by clicking on the Google Ads logo at the top left.
In the black menu, on the top right, you’ll find a tool icon to access all the Tools & Settings in Google Ads.
Through this article, you will get to know the ”Keyword planner” and “Google Analytics”.

Gray vertical column on the left side of the screen in Google Ads
The gray column is located behind the black vertical column on the left side of the Google Ads platform and contains the following tabs:
- Overview
It gives you a quick overview of the results of all active campaigns in the selected time period. Number of ad impressions, number of clicks, number of purchases, ad costs…
- Recommendations
Based on an analysis, Google Ads recommends how you can optimize your ad campaigns for a greater impact. I advise you to read the recommendations and consider which ones to implement and in what way.
- Campaigns
A list of all active campaigns in the selected time period. Here, you’ll also be able to add new campaigns, change the settings of a particular campaign, check the relevance of a campaign, or stop a campaign.
- Ad groups
Each campaign can have several “Ad groups”.
In the case of a Search Campaign, it’s best to create an individual Ad Group based on a related search keywords.
So here you can access an individual ad group to check its results, edit it, or create a new ad group.
- Ads & extensions
Of course, this part will be of great interest to you, as it will show the performance of an individual ad, which you can also edit, duplicate or create a new ad. The same goes for ad extensions.
Keywords
After a few days of advertising, data will be available to let you know exactly which keywords people type into Google the most oftenly and then click on your ad and make a purchase. After some time you will then turn off keywords that are too expensive, and those that don’t generate purchases. The goal is to keep the available advertising budget available only for the keywords that sell the most at the lowest price.
- Audiences
Here you can set or create audiences (especially for Display Network and Video advertising) or track your advertising results by audience.
- Demographics
You can specify gender or age of the target group and also monitor the results by individual categories.
- Devices
Find out whether people who click on your ads are using a smartphone, computer or tablet. Also which operating system they are using, which model, etc. Use the results in your settings for future campaigns.
Main control panel for Ad Campaigns
Black banner on the left with the main control panel in Google Ads.
When you click on the white arrow on a black background on the far left of the menu, a new main control menu will open for all types of ad campaigns on Google Ads.

Option 1
If you select “All campaigns” in the black Google Ads menu consequently group results from all campaigns will be displayed together in the submenus in the adjacent gray column (e.g. for keywords).
Option 2
However, when you click on an individual campaign in the black menu, you’ll see results related to that campaign (e.g. keywords) in the adjacent gray column.
Google Keyword Research
A key feature of search ads is that they appear when a person types in a particular word on Google. Therefore, of course, it is necessary to first determine which words people from the target group type into Google.
To do this, use the tool Google Keyword planner.
To find the Google Keyword planner, click on the tool icon in the top horizontal menu. Find the category “Planning” and select Keyword Planner.
The Keyword Planner has two basic features:
- Discover new keywords
- and
- Get search volume and forecast
First, use the Discover new keywords feature.
It offers two new sub-functions:
- Start with keywords
With this option, you type in a few keywords and then Google shows you how many searches for these and related keywords have been in the selected country and time period.
- Start with a website
Here, paste a link to the website for which you want to check which keywords it already ranks on. So you learn a lot of interesting things about the competition.
As an example we will take a website that deals with the manufacture and installation of windows. Since the entire website is dedicated to this topic only, select the first of the offered settings and click Get results. It will show the keywords that this site already ranks on Google, the number of monthly searches, the competition, and the cost-per-click for an individual keyword, etc.

Defining a list of keywords to use in Google Ads
So Google gives you the number of monthly searches for an individual keyword. It is important that you do not throw all related keywords in the same bin, but that you form subgroups of related keywords. This will allow your ads to show on really accurate searches on Google.
There is a big difference between people who type in Google e.g. “Windows” and those who type “wooden windows price list and installation”.
Google Ads provides you with the Grouped ideas tool to sort your keywords into groups on an ongoing basis.
Next, I’ll assume you’ve already formed keyword groups, and then I’ll explain how to arrange your keywords in them.
Check the box in front of each keyword group. You can also review a group before placing the appropriate keyword in it to see which keywords it already contains. To do this, click on the arrow, it will show the keywords that the group contains.
Once you’ve selected all the relevant groups, you’ll add the new keyword in them (2.) You can add them directly to your ad campaign, or save them to your plan, which is more convenient to use in new ad campaigns in the future.
In the window labeled 3., you’ll be able to choose whether to group the search terms or add them as a single ad group. For an easier review, it is better to add them by group.
Keyword match type
In the box labeled 4., you’ll be able to choose the type of keywords that match the actual searches of people on Google. Available are the following categories “Broad” match, “Phrase” match or “Exact” match of keywords.
- If you choose »Exact match« your ad will only appear to people who have typed in the exact keyword you specified.
- If you choose »Phrase match« your ad will also show if people type very similar keywords or synonyms into Google.
- In the case of choosing »Broad match« however, your ad will also show if people have typed words into Google that are only partially similar to the ones you specified as search terms. It can result in many clicks, many costs and few sales.
I suggest that you choose the option »Phrase« or »Exact« match.
Click »Add keywords«.

»Plan overview« or an Overview of the Search Keyword Plan
You can now further analyze the created plans with groups of related keywords by clicking on the “Plan overview” button, which can be found at the top left menu.
You’ll get a forecast of how many clicks and impressions you’ll receive with a given daily advertising budget per individual search keyword (1. in the picture above).

GIFT! Get to know the content of the book
Get the digital index of the book "Digital marketing from A to Z".
Adding keywords to the campaign
Unfortunately, the tool does not allow us to automatically add keywords from the plan to an existing campaign. So I will now just describe as an example how to create a new campaign in non-guided mode.
In the “Ad groups” view in the left menu (2.), select all the ad groups (3.) from which you want to create a campaign. Then click on “Create campaign” (4.).

Then, in the next window, specify a campaign name and set a daily advertising budget. After clicking Next, a window will appear with the caption “Name of your campaign – was created”
Return to the Google Ads environment.
Non-guided Google Ads Campaign Settings
Now your knowledge about the campaign settings that you gained at the beginning of this article will come in handy, but as you will see, it will be easier and more transparent to create and modify campaigns in this way.

Expand the left menu and click on your newly created campaign.
The campaign includes all the ad groups created. In the second menu on the left, click on “Settings”. To set each area individually, click the arrow on the right next to each area.
Under Goal, you’ll select Campaign Goal. This can be “Sales”, “Leads” or obtained e-mail addresses or “Website traffic”. In our case, we choose Sales.
In “Networks”, select only the Search Network, leave other options blank.
We set the locations as described at the beginning of the article. The same goes for languages and advertising budget.
In “Bidding”, you will select “Maximize clicks” as beginners. Once you know how to set up conversions, you’ll be able to select the “Maximize conversions” goal instead of “Bidding.” To do this, first expand the “Bidding” window, click on the blue link “Change bid strategy” and click Save.
When you have finished with the settings, to which you can always return to, you can start creating ads.
Setting up Google Ad Sets
For each group of keywords we create its own Ad Set. This allows you to specify exactly which ad to show for a particular group of search terms. At the same time, Ad Sets compete for an advertising budget that Google ranks from less successful to more successful.
This will allow you to identify the most successful keyword groups and the most successful individual keywords over time. You will then use this behavior to improve Google advertising as well as your ON-SITE and OFF-SITE Google SEO optimization.
So create as many Ad Sets as you have groups of related search keywords.
Then, create ads whose text is tailored to each of these Ad Sets.
It’s also a good idea to create subpages on the website that are content-related to groups of content-related keywords.
Example:
A group of content-related keywords associated with “wooden windows price list ljubljana”.
Then the price list for wooden windows for a branch or agent in Ljubljana must really be presented on the subpage to which the ad leads.
How to create an ad on Google
In the black column of the menu on the left, select an individual campaign and an ad group below it. Then in the adjacent gray column above, click on the option “Ads & extensions”. To create an ad and extensions, click on the blue circle with a plus sign in the middle. You will have two options:
»+ TEXT AD«, which is a regular text ad, and
»+ RESPONSIVE SEARCH AD«, that represents the advanced version of the ad.
In this article I will present the creation of the advanced version, »Responsive search ad«.

Responsive search ad
The advantage of this ad format is that we can test a very large number of different titles and texts of the ad itself. This way, we can include keywords from a particular search keyword group, making the ad more interesting to the person who just typed one of those words into Google.
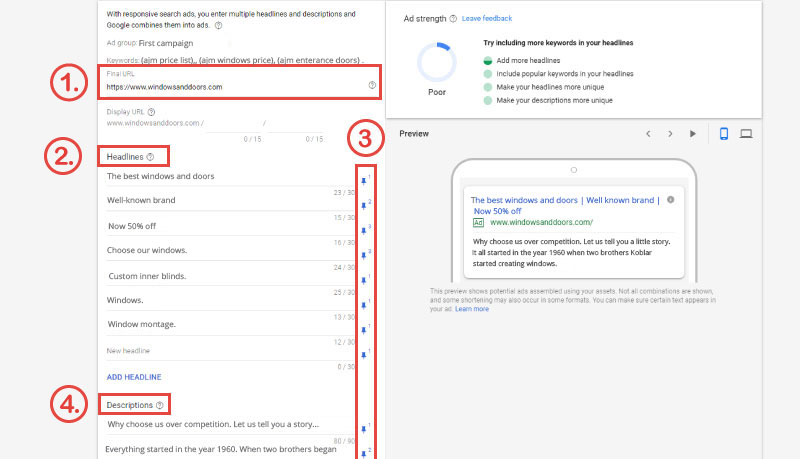
When creating a Responsive Google ad, first enter the URL of your (sub)page to which you will redirect the visitor (1.)
Then (2.) write a large number of titles. Each title consists of three parts. Write them so that they act either on their own or as a connected whole.
Include a search keyword in the first part of the title.
In the second, name your brand or company.
In the third part of the title, include a call to action.
The Response Ad creation environment is set up so that you can enter a myriad of texts, then on the right click (3.) to select whether the text should compete for the first, second, or third part of the title.
Do the same for (4.) ad text, which consists of two parts.
Google will then display an ad to the person who typed a keyword into Google, containing text that is as close to the search content as possible.
It is true that creating this type of ad is quite demanding, but in the long run it always pays to invest more time and knowledge to overtake the competition.
Congratulations! You have now successfully created your ad. But it is only added to one group of keywords. And it needs ad extensions.
Ad Extensions
Ad extensions allow you to highlight the current offer below the ad, offer the visitor a link to the most relevant page, offer a link to folders, and the option to call or send email directly from the ad.
Based on the options, they need a lot of attention.
First, find a specific ad group in the black menu column on the left side of the screen.
Then, in the adjacent gray command column, look for “Ads,” “Extensions,” and “Automated extensions.”
Select “Extensions” and below, right at the bottom of the page, click on “Create Ad Extensions”.
As on the print screen, you will see the following features:

Types Ad Extensions
You can choose from ten types of Google ad extensions. Let’s look at some of the most useful:
- Sitelink extension
Simply provide a link to a specific website, and name the link to express the potential customer’s benefit or problem.
- Callout extension
Highlight the benefits with the text and call for action, e.g. Free shipping. Only for the first 10. You can add up to 4 such extensions.
- Call extension
Add a phone number to your ad. This way, people can call you by clicking on the number on the ad itself (applies to mobile phones).
- Message extension
Visitors can send a message to your email or phone by clicking on the ad.
- Location extension
It is an extremely important extension and you will need a Google My Business profile first. The location extension allows visitors to get the directions to your business by clicking on the ad.
- Price extension
Add a price of the product to the ad and a direct link to the product.
I recommend adding up to two extensions to your ad. This will make the ad more noticeable and at the same time not much more expensive. Google charges more for running ads with extensions (but it’s true that they’re more effective).
With the added ad extensions, the creation of the ad is complete.
But the ad is tied to only one ad group (Ad Set).
How to duplicate and paste a Google ad into other Ad Sets
Luckily, you don’t need to re-create ads for each Ad Set separately, but you can copy and paste the ad into other Ad Set.
Follow the logic: Ad group> Ads and extensions> Edit> Copy
Click on the ad group in the left black menu. Then, in the adjacent gray column, select Ads & Extensions. Then highlight the desired ad. Click on the Edit button and select the “Copy” option.

Then click on the second ad group in the far left black menu, and then click on Ads and Extensions in the adjacent gray column. Since we clicked “Copy” in the previous step, you will see the option “Paste” in this window.
Click on the icon and in the next step click on “Paste” again (do not check the additional two options that appear in the next step).

We repeat this process for all ad groups and paste the ad we created into them.
The ads are now created. If necessary, you can now further edit each ad in an individual audience. Above all, it’s important that at least the first title refers to the keywords that are typical of the keyword group in this Ad Set.
Setting up Google conversions and connecting Google Ads to Google Analytics.
To achieve the best advertising results, you need to set up conversions and track everything on your website to optimize your ad campaigns.
The easiest way to achieve this is to use the Google Analytics platform. You can access this tool in Google Ads by clicking on the tool icon to access the “Tools & Settings” category. In this environment, find the option “Linked accounts”.
Select Google Analytics. In the next window, you will see your Google Analytics account. If you don’t already have one, you need to create one beforehand – look for Measurements in “Tools & Settings” and then select Google Analytics.
If you already have a Google Analytics account, the “Link” option will be displayed under Actions.
Click on this option and in the next step, highlight both offered options. Now just confirm the connection by clicking the Save button. In the next window select both options and save. Google Ads and Google Analytics are now linked.
Set up a Google Ads conversion in Google Analytics first
In Google Analytics, first click Admin at the bottom left.
Then select the last one on the right (View) from the three columns displayed.
In it, select the Goals option.
Click “Create new goal”.
Goal setup
The “Goal setup” window will open. You will have the option to select “Template” or “Custom” below. Select “Custom”. Click “Continue”.
Goal description (you can skip this step).
Select Destination Name, e.g. Product X added to cart.
For “Type” select “Destination” (this will measure the goal based on when the user arrives on a particular page).
Save the Goal. Because you linked Google Analytics to Google Ads, this goal is also imported into Google Ads as a conversion goal.
You can now almost start your ad campaign. But first you need to enter more information about your business and enter a means of payment. It just doesn’t work without it.
In order for the campaign to be activated, you must enter your business information and enter a credit card.
In the upper, horizontal menu, click on the tool icon to access the Tools. Find the Billing category and then Billing settings. You now enter your company and payment information. Following the content of two main steps:
- Step 1: The country in which your company is based or»Billing country«
- Choose a country in which you operate.
- >Step 2: Information about your company or »Costumer info«
- »Account type« is set to "business". Given that if you are advertising products you are probably a company. If not, just enter your name.
- »Tax information« - Enter your business tax number so that it will appear on your ad invoices and you will be able to claim them as a business expense.
- »Name and address« - Enter your business name and address.
- »Primary contact« - Your real data and phone number.
- »How to pay« - Choose »Automatic payments«
- »Payment method« - Add a card - Your payment will only be made when you have spent a certain amount, which is listed as a "threshold", e.g. 300€ or after 30 days of use, whichever comes first.
- Click Submit and your status will be marked "Pending", which means that the Google team is checking your data.
If you have read the article all the way through, congratulations. You’ve gained enough information to get started with Google Ads. Through the creation of the campaign, you will notice that the platform has many more functionalities, but even through 5,000 words it is not possible to capture them.
I invite you to read another one of our articles about digital marketing.
For step-by-step video tutorials, check out our hands-on e-courses.
Find out more about them at https://www.martin-orange.com/e-courses/

