
24 April
Through the article we will discuss Facebook advertising and learn how to:
Create Facebook Business Manager
The right way to start advertising on Facebook is to first create a Facebook Business Manager.
It’s relatively new on Facebook, so you might not find this step in older tips. In some cases, you can still bypass this step, but since Facebook has given special importance to this tool (it makes it easier to separate bad accounts from positive ones), it is best to get used to it immediately. Sooner or later, the use will be mandatory for all advertisers.
Create a Facebook Business Manager at business.facebook.com. The window you see in the image below will appear. Click “Create Account”. In print screens, the settings on Facebook will be displayed in English. Therefore, if you don’t have Facebook set to English you’d better change the language by visiting your personal Facebook profile. Look at the bottom of the left column (below the pictures of your Facebook friends). There you will see different languages. Choose English.

In the next step, you will need to log in to your personal Facebook account and then (picture below) you will specify the name of the “Facebook Business Manager Account”.

Fill in the remaining information required by Facebook Business Manager (about your company).

You have created your Facebook Business Manager. This is what its main view looks like. From here, you will have access to all the parts you will need for advertising.
In the menu on the left, we will access all the important parts of the “Facebook Business Manager”.

How to create an Ad account
Your next step will be to add an “Ad Account” or your advertising account. Click on “Add Ad Account” below. A window will open and you will have two options. If you already have an Ad Account, you’ll just add it in this step, but if you don’t have one yet, you’ll create one in this step.
In our case, we will act as if you do not have an Ad Account yet, so you will click on the right button “Create Ad Account”.

In the next step, you will choose a name for your Ad Account, time zone and currency with which you will do business. Be very careful to choose the right time zone and the right currency because you will not be able to change this anymore. Initially, you will only be able to create two Ads Accounts. By investing in advertising, you will be able to create up to six advertising accounts. Click Next.

In the next step, you will add a user (that is, the person you added when you opened the Business Manager, and assigned rights to them. Given that this is you, you will add all the rights that Admin status brings. Never give Admin rights to others (unless you really trust them personally). Click Next.

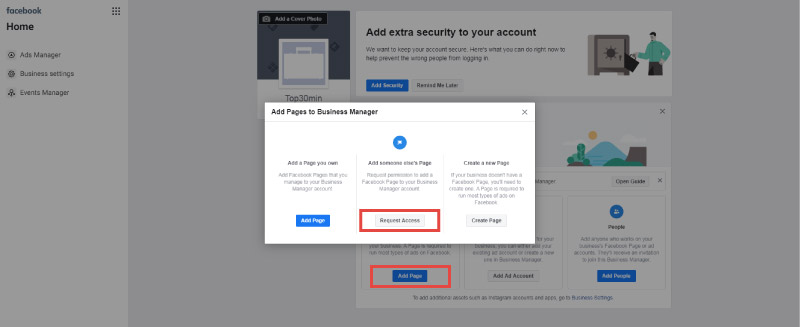
You will then add your Facebook page to Facebook Business Manager through which you want to advertise. In this case, we will assume that you already have a business page and are its admin, so you will select the first option (Add Page). If you don’t have your Facebook page yet, select the “Create page” option and follow the steps.
If you selected the first option (Add Page), you will now need the URL of your Facebook business page. You can find the URL by visiting your Facebook page and copying the complete web address (e.g.: https://www.facebook.com/martinorange).
In case you have multiple Facebook pages, you will need to select the primary page. If you only have one, this will of course not be necessary.
When you complete this step, you will return to the home environment of your Facebook Business Manager.
Before you can start advertising, you’ll need to add a mean of payment, so we’ll look at this step in the next step. In the menu on the left click »Business settings.

You will be redirected to the “Business settings” environment.
Now click “Add payment”. You will see the option to add a payment method – click the blue Add button in the middle of the page.
In the next step, enter your credit card information or add your Paypal account.

– 100 € discount
– 100 € discount on all e-courses.


How to install Facebook pixel
Before we focus on the Ad Manager and start creating ads, we have to do one of the most important steps. Create and set up Facebook Pixel.
First, make sure you’re in the Business Settings environment. Click on “Data sources”, “Pixels” and “+ Add” in the middle of the page.
Select the second option: “Set up the pixel now”.
If the website on which you will install Pixel is made on a CMS WordPress, Shopify or one of the other supported platforms, you will be able to choose the first option.
Those of you who know how to manage your website yourself will choose the second option, and paste the Pixel code as high as possible into the code of the entry website.
In the third option, the easiest way for most, you send the Pixel code to the administrator of your website. They can paste it directly into the code of your entry website (this is only suitable for simple websites without an online store or with just a couple of products).
Is the offer on your site extensive?
If you have a large website or online store with many products, you should use the Google Tag Manager tool. In this case, install only one code on your website – the GTM code. Install all other tracking codes (e.g. Facebook Pixel, Google Ads Tag, LinkedIn Tag, etc.) directly into Google Tag Manager. Install the Pixel code into the GTM program. Read more about it in the article about GTM on our website.
Let’s look at the first option:
In this step, you will first select the platform on which your website was made. If it was made on the WordPress platform, select WordPress at the bottom of the page. A window like this will appear:
When you click Continue, you have the option to download the plug-in that you will install on Worpdress.
Now, log in to your WordPress site.
In the left menu, click “Plugins” and “Upload Plugin” at the top of the page. Then click “Choose Your File” – the option appears somewhere in the middle of the page. Select the file you uploaded from the Facebook page in the previous step.
In the upper left corner, it will say “Plugin installed succesfully”. Click “Activate plugin”.
Facebook will guide you through the process when you click “Continue”.
You will come to the Test events function in which you check if the “Pixel” is working properly.
After clicking “Send Test Traffic”, a green dot should appear stating that the Pixel is working properly. The following window will appear (below).
Now you will set certain “events” that will help you separate visitors into those who just visited the site, and those who have done something more, e.g. enter their email address, added a product to their cart or bought the product.
Click on “Test Events in Events Manager”.
How to create a Facebook event
Now Facebook will automatically redirect you to “Events Manager”, which is part of the Facebook Business Manager. Set up at least four basic Events on your website:
- page visit,
- product added to cart,
- e-mail address acquired,
- purchase of a product.
- PAGE VISIT
For option 1. (URL Contains) write down the domain name e.g. Mypage.com.
For option 2. (Name), type “Page visit Page name”.
For option 3. (Category), check “View content”. Leave the value blank.
- AQUIRED EMAIL ADDRESS
For option 1. (URL Contains) write down the domain name e.g. Mypage.com/contact*.
For option 2. (Name), type “E-mail address recieved”.
For option 3. (Category), highlight “Contact”. Leave the value blank.
- PRODUCT ADDED TO THE CART
For option 1. (URL Contains) write down the domain name e.g. Mypage.com/cart*.
For option 2. (Name), write “Product added to cart”.
For option 3. (Category), check “Add to cart”. Leave the value blank.
* Add a product to the cart on your page. You will get a new URL. Copy the part of the URL that is the same for all products added to the cart. You then copy this part of the URL and paste it into the “URL contains” field.
- PURCHASE OF THE PRODUCT
For option 1. (URL Contains) write down the domain name e.g. Mypage.com/order-recieved*.
For option 2. (Name), type “Purchase”.
In option 3 (Category), select “Purchase”. Leave the value blank.
*This time, however, you will need a part of the URL that appears on each thank you page after purchasing the product. One of the usual components of a URL in this case is thank-you-for-purchase.
“The most important conversion is, of course, ordering the product.”
Your Facebook Pixel will constantly learn about the type of person that usually adds a product to their cart or buys your product.
Once Facebook has received data on at least a hundred cases where site visitors have added a product to their cart, you will be able to create a Lookalike target group Add to cart: you will specify e.g. 5% of all people who use Facebook in Slovenia and have similar characteristics and interests on Facebook as people who have added a product to their cart in your online store.
Once you reach about a hundred purchases, however, you will be able to form a Lookalike group Purchase for people who are similar to your customers in terms of their characteristics, interest, behavior, and purchases. Then Pixel takes over the design of the target group itself and this is usually more effective than your target group settings.
When you have finished adding the first “Custom Conversion”, click on “Custom Conversions” on the left and then “Create Custom Conversion” on the right.
You will come to the same window as in the previous step.
Repeat the process for all conversions you want to set.
Thus, the Facebook Pixel and events are set up and you can continue to create target groups, or you start creating ads and design the first type of target group (by characteristics) while creating an ad campaign.
How to create your first campaign in Facebook Ads Manager
To access the “Facebook Ads Manager”, click on the icon of the square consisting of circles in the upper left corner of the “Business Manager”. A window appears, which is the main menu of the “Business Manager”. Select “Ads Manager”.

When you first visit Ads Manager, you will of course agree to the rules of advertising on Facebook. Click “Accept” since you simply have no other option.
You are now in the “Ads Manager”. Let me introduce it to you briefly.
On the left you will find a menu with access to “Account Overview”, “Campaigns”, “Ad Set” and “Ads”.
It is very important that you understand what each section means.
In the “Account Overview” you have a complete overview of the joint advertising. At the very beginning, of course, there is no data here yet.
Next, we need to understand the difference between “Campaigns”, “Ad set” and “Ads”.
Before you can start advertising, you must first create a Facebook advertising campaign.
You can create one or more Ad sets in it.
In the ad group (Ad set), you’ll define your audiences, ad goals, and advertising budget.
Then you can add multiple Ads to each Ad Set.
- CREATE YOUR FIRST FACEBOOK ADVERTISING CAMPAIGN
Select “Campaigns” from the menu on the left and click “Create Campaign”.
A window will open in which Facebook asks you if you want guided creation (left) or standalone (right).
Given that you will need to know the platform independently enough sooner or later, we recommend selecting the right button (Quick creation).
A window will appear (shown below). Such a window will open regardless of whether you are creating a campaign, an ad group, or an ad.
In this step, we will focus on creating the (first) campaign.
Please specify a campaign name first. The name should be descriptive so you know which product it is advertising and what it contains.
There are several goals available for ”Campaign Objective”. For the purposes of this article, we will select “Conversions”. It makes sense to choose this goal only when you have already created a target group through advertising.

What do the campaign settings ”Split Test” and ”Campaign Budget Optimization” mean?
- FACEBOOK SPLIT TEST
Use with the first campaigns to test ad campaigns. This setting allows you to test which audience responds better, which ads are most effective in achieving your campaign goals, which ad placements are performing best, and so on.
- FACEBOOK CAMPAIGN BUDGET OPTIMIZATION
This feature allows you to automatically switch your available budget from less successful audiences to more successful ones in your advertising. And the same goes for ads. So you don’t need to think about how much money you would spend on which ad because Facebook does it automatically.
I will not choose any of these options for the purposes of this article. So in the bottom corner I click on the “Save to Draft” button.
Then click on “Ad Set” in the left menu.
In the next window, select “Create” and click “Save to Draft”.
How to create the first ad group setting
- Ad set
As mentioned, in this step we will set the “Ad Set” or settings of target groups and budget.
Thus, the name of the “Ad-set” has to contain some key information that you will choose here, for an easier review later. Usually, the name of the main target group and some of its characteristics are chosen for the name of the Ad Set.
The name of the Ad set will look something like this:
- Women 25-45 | Ljubljana D + M (Desktop + mobile) 5eur (Daily budget)
Our goal will be to test which settings work best, so we recommend that you try more settings. The names of the other Ad sets you create might look something like this:
- Women 25-45 | Ljubljana page visit | D + M | 5eur
- F + M | 25-45 | Ljubljana page visit | D + M | 5eur
- F + M | 25-45 | Ljubljana basket | M | 5eur
…
Now let’s look at how to determine the settings of an individual Ad Set:
- CONVERSIONS
In case conversions are the goal of your campaign, you will choose the type of conversion for which Facebook will optimize the ad campaign. This is a very important decision.
You cannot successfully use the “Purchase” or “Add to Cart” conversion at the very beginning of advertising. Therefore, I recommend that you pick conversion goals across multiple campaigns by going from “Pageview”, “Lead”,“Add to Cart”, and the last one “Purchase”.
Facebook Pixel therefore needs to be taught and with such an approach, it will determine the profile of your ideal customers through several well-planned campaigns.
Facebook is capable of effective optimization and this is one of the key steps on which the success of your campaign will depend.

- BUDGET & SCHEDULE
In the next step, set the campaign budget. You can choose between daily or lifetime budget.
The usual choice is to set a daily budget. But how much should you invest in advertising?
I suggest you start with small stakes and test the response.
- TARGET GROUP SETTING IN FACEBOOK ADVERTISING
Audiences are probably the most important part of advertising. When your audience is set up correctly, you can expect advertising success. And vice versa in case this is not the case.
Target groups are divided into:
- Custom Audience,
- Lookalike Audience,
- and Saved Audience.
- SAVED AUDIENCE
Once you start advertising and you have not yet had any visits to the website and the Facebook Pixel is not yet installed and various custom audiences haven’t been created, the only option you have is to create the, so called, Saved Audience.
So select “Create new audience”. (1.) (see picture below)
To define your audience, you first select a location. It can be an entire country or just a single city or several cities. For cities, you can also select a radius around the city e.g. city and 10 km outside the city. Or 20 km around the city. (2.)
You then select the age of the audience you want to target, e.g. from 25-50 years. (2.)
Then determine the gender of the target group. You can target both men and women. Or just men or just women. (2.)
And now follows the most important part of defining your audience: determine the interests of your audience. So what your target group is already interested in or is characterized by. (3.)
You can choose interests from demographics, family relationships, entertainment, parenting, sports, food, drink, shopping, fashion, technology products, and more.
I suggest you start by typing a keyword in the box. If you want to, for example, target dog owners, type the word “dog” in the search box. Facebook will then suggest interests, pages and groups related to the keyword. Of course, you will need more imagination and, above all, do a lot of testing.
In order to be able to choose the interests of your target group correctly, you first need to know your target group very well.
But in this step, pay attention to the size of the audience. One of the biggest secrets of advertising on Facebook is the optimization via the Facebook pixel, which means that the ad will be optimized only after e.g. 5-10 days of uninterrupted advertising.
It is good that the size of your target group is at least 50,000 or better yet, 100,000 people.
Then click “Show more options”. You can now select the language and connections. (4.)
Choosing a language does not mean which language they actually speak but in which language they have their Facebook profile set. Attention! Selecting only one language will exclude all other languages.
You can also select Connections. Here you will select “People who like your page” when you decide to advertise to people who are already your followers, so the ad will achieve a bigger “Reach”.
As you probably know, most fans don’t see your Facebook page. By selecting this option, you can show your ad to as many fans as possible. Of course, this only makes sense if you have a lot of quality fans.
Once you’ve created a group, you can save it (“Save this Audience”) to access it while creating other ad campaigns by clicking “Saved Audiences”.

Where will the ads appear? This is determined by Ad placements
You will now choose exactly where your Facebook ads should appear. In addition to various positions, they can also be displayed on Instagram, Messenger or with external Facebook partners (various websites or mobile applications).
You can choose from the following ad placement options: (1.)
- AUTOMATIC
This option means that your ads will appear in all possible positions. With test campaigns, you’ll find out which placements work best for you.
- EDIT
To specify individual placements, select the “Edit placements” option (1.). This allows you to pinpoint exactly where you want and where you don’t want your ads to appear.
If, for example, you only want to advertise on Instagram, select only Instagram, and exclude all other platforms. This is only as an example, for ease of understanding.
- TYPE OF DEVICE (2.)
You can also specify whether ads on Facebook should appear on computers (both desktops and laptops) and mobile phones. Or just on smartphones and tablets?
If you select only mobile devices, you can then further select whether the ads should appear only on smartphones with the Android system and / or even on iOS smartphones?
Those who know their target group very well can also choose versions of Android or iOS.
- PLATFORMS (3.)
There are four platforms: Facebook, Instagram, Messenger and Audience Network.
- PLATFORM PLACEMENT (4.)
You can now specify even more precisely where your ad should appear on a single platform.
The main ad placements are divided into:
- »Feeds« or timeline (on Facebook and Instagram)
- »Stories« (on Facebook, Instagram and Messenger)
- Suggested videos or »In Stream«
- »Messenger Inbox«
- »In-article«
- »Apps and Sites«
It is very important that you determine through testing which of the placements work best for your target audience and your ad. It is better to choose fewer placements and dominate there than to scatter your budget among multiple placements and get lost in the flood of competing ads.

And we came to the last step, in setting up an ad group or “Ad Set”, namely “Optimization and Delivery”. Here, I recommend that in case you optimize the “Ad Set” based on the Pixel, which you selected in the second step, leave the settings as they are already defined.
You have almost completed the settings for this Ad Set. Only check if its name matches the actual settings and then complete the process.

GIFT! GET TO KNOW THE CONTENT OF THE BOOK
Get a digital index of the book "Digital marketing from A to Z".
How to create your first Facebook ad
The creation of a Facebook ad is finally here.
In the menu on the left, select Ads and then “Create Ads” in the middle.
A window will appear in which you select for which “Ad Set” you want to create an ad.
The name of the ad should also be descriptive so that you always know what the ad is advertising.
A window will appear as shown in the image below.
Selecting “Create new ad” will mean that you will create a new ad. However, you can use an existing ad to advertise. (1.)
I will describe the process of creating a new ad.
Upload a picture or video. Image must be larger than 600x600px. (2.)
Once we’ve added an image or video, it will appear on the right side of the form under “Ad Preview”. This way, you can keep track of how your ad will look on a single platform.
It is very important for photos that they do not contain any text. Officially, text can cover 20% of the photo, but in reality this is not the case.
Photos with less text will also look less advertising and more natural.
Once the photos have been uploaded, they need to be cropped to fit the individual placement. So next to each photo, click Edit and make a crop of the photo.
Photos for ads on Facebook and Instagram stories should be upright. For each placement, Facebook gives you instructions on the required photo size.
When uploading a video you’d like to use in Facebook ads, it’s important to choose its thumbnail. When to the uploaded video find Customize Video.
This gives you the option to crop the video, cut out individual scenes, write subtitles and add a thumbnail. The thumbnail should be without text or as little text as possible. A video with more text in the thumbnail will have less reach or will even be rejected. I recommend uploading a special photo (not a screenshot from the video) as a thumbnail.
Best of all, the video is fully edited before you upload it to Facebook Ads Manager.
- AD TEXT (3.)
It is necessary to write:
- Ad text (»Primary text«),
- Ad title (»Headline«),
- and a description of the content of the ad (»Description«).
The easiest way to see where something appears is in the preview of the ad on the right.
You will see that, for example, the display of the ad in the »Desktop news feed« shows more text than, for example, »Mobile news feed«. Therefore, customize your texts so that the message is clearly visible on all platforms where you will be advertising.
When people see the ad, they first look at the photo. Then the title.
Write the ad title first. With the title, remind of a problem or benefit for the customer. The goal is to get people to start reading the ad text.
The ad text should initially focus on the problem / solution for potential customers.
The goal is to get people to read the ad and to click on the link. Sales then follow on the website. Use emojis for greater visibility and expressiveness of the text. Use direct marketing knowledge when writing texts.
If you want your ad to show on Instagram, you must not write more than 2,000 characters of text.
If you scroll down the center column where you’re currently editing your ad, you’ll be able to adjust it further:
- “Destinations” or the URL of a web page that opens after clicking on the ad. So paste a link to the (sub) page you want to advertise.
- “Languages” oz. Translations. If you would like to make one ad suitable for different countries or languages within the country, edit the texts here. With ad translations in in one country you can target foreigners, tourists or students from abroad.
“A photo attracts attention. The title convinces you to read the text. The purpose of the text is to convince you to click on Read more. The mission of the text is to prove that we can solve a potential customers problem. We close the sale on the landing page.”
Next we set up “Tracking”. Here you just choose your Facebook Pixel.

Congratulations!
You can now click “Publish” and publish your ad.
This does not mean that the ad will start playing immediately, as it must first be approved by Facebook.
You can check whether the ad is still under review or approved or even disapproved in the left column under “Delivery”.
You clicked Publish, but that doesn’t mean the Facebook advertising story ends here. In fact, it’s barely starting. You have learned the basics and have the knowledge to have the potential to run a successful advertising campaign.
You will only achieve excellent results through testing.
How to test Facebook ads
It mostly depends on what you want to achieve through Facebook advertising. Do you just want to warm up the audience? Do you just want to achieve greater reach for your posts? Do you just want to increase the number of followers? Or is your purpose selling a product?
Given that we cannot go through all directions here, I will suggest a basic strategy when you are interested in selling a product in this article. I will only describe the basic steps, as the whole process is quite detailed and depends on many variables.
- TESTING OF AD GROUPS OR AD SETS
We create 5 different Ad Sets with a budget of € 5 per day for each Ad Set. Each Ad set contains the same ad. Then we advertise approximately one week. The goal is to determine which target group or Ad set responds best.
We set a higher budget for the winning Ad Set (or two), e.g. 25 € per day.
In the Ad Set, we create 5 versions of the ad (with different texts, photos, videos). We advertise again in a week or so. Depending on the results, you choose one or two of the best performing ads.
You are now ready for a real ad campaign. You have the best target group or Ad set and best performing ads.
In the “estimated daily results” box, you can also see how many people will potentially see your ad with the currently selected budget. If the number of these Facebook users is 3,000 a day and your target audience is 100,000 people, it will be necessary to advertise for a month or so before everyone sees the ad. But after about three weeks of advertising, the price per impression will rise as the number of those who have not yet seen the ad will decrease.
In a way, it’s therefore easier to operate in markets where target groups of 300,000 people or more can be formed, because a successful ad can be left to run continuously for months.
Here are some more important tips:
- Do not modify an ad that works well. To try other settings, create a new one or duplicate an existing one.
- When you find the settings or campaigns that work copy them.
- LOOKALIKE AUDIENCE
Once we have been advertising for a while and diligently filled the Facebook pixel, and collected at least 100 occurences of an event – in the best case of a purchase, we will be able to create “Lookalike” groups.
Thus, you can, for example, create a target group of 1-10% of people who use Facebook in Slovenia and are similar to your customers.
“In marketing, the most important thing is to whom you want to send a message about your offer. That’s why creating a target audience is probably the most important part of Facebook advertising.”
We wish you pleasant exploring of Facebook advertising. Despite the fact that the article is very extensive, we were not able to cover all the breadth and especially important details related to Facebook advertising.
So first do it in practice and test what you read in the article. Then you can read some more articles we have prepared on this website. Knowledge and experience from practice will lead you to real success, which will be shown in your satisfied customers, a high positive balance on your bank account and a sense of personal satisfaction.
I invite you to read another one of our articles on the topic of digital advertising. And for step-by-step video tutorials, check out our hands-on e-courses.
Find out more about them at https://www.martin-orange.com/e-courses/

